Friday, November 15, 2013

Android Jelly Bean 4.2.2 firmware installed on Pipo S1 tablet Firmware & Tools Free Download

Here is the easiest to do this firmware update:
1. Download Android Jelly Bean 4.2.2 firmware image from: link1, link2 or link3.
2. Put your Pipo S1 in 'firmware update mode'.
3. Run Rockchip Batch Tool v1.7, select the proper image .img file from your desktop, and after your device is found by the program, press the 'Restore' button and wait for 2-3 minutes to finish. VERY IMPORTANT: disconnect the USB cable right away the tablet goes into recovery. The first boot is very long, wait at least 15 minutes.
 What we have at the moment:
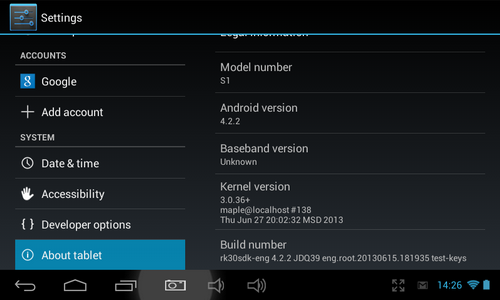
- Firmware 4.2.2 from PIPO S1S
- Removed Chinese applications
- Added root
- Default language English
- Customise kernel
- Closed G-sensor, all other devices operate, including sound
- Camera Resolution approximation increased to 3 megapixels
- CPU Speed 1604 MHz GPU clock of 266 MHz
- Not mounted USB hard drives
- Antutu produces about 8,000 points
1. Download Android Jelly Bean 4.2.2 firmware image from: link1, link2 or link3.
2. Put your Pipo S1 in 'firmware update mode'.
3. Run Rockchip Batch Tool v1.7, select the proper image .img file from your desktop, and after your device is found by the program, press the 'Restore' button and wait for 2-3 minutes to finish. VERY IMPORTANT: disconnect the USB cable right away the tablet goes into recovery. The first boot is very long, wait at least 15 minutes.

- Firmware 4.2.2 from PIPO S1S
- Removed Chinese applications
- Added root
- Default language English
- Customise kernel
- Closed G-sensor, all other devices operate, including sound
- Camera Resolution approximation increased to 3 megapixels
- CPU Speed 1604 MHz GPU clock of 266 MHz
- Not mounted USB hard drives
- Antutu produces about 8,000 points
[update]
Thanks to Angelo Machacuay, we have now Android Jelly Bean 4.2.2 with CWM and fixed G-sensor (autorotation is now working).
1. To install CWM on Pipo S1 first download the archive from here, here or here. Extract it and run RKAndroidTool.exe. Double click on recovery address and change it from '0x00010000' to '0x00014000'. Leave all the rest fields intact and press 'Flash Rom' button. Wait for the proccess to finish and reboot your tablet. You're done! [Optional] If you want to upgrade from CWM-based Recovery v6.0.2.7 to v6.0.2.8, then download this zip file (mirror1 & mirror2), copy it on your micro SD card, reboot into recovery and install it. See this video for details.

2. To install G-sensor fix. First download fix.gsensor.pipos1.120.zip from here, here or here. Copy it on micro SD card, install Quick Boot free from Play Store, run it and boot into recovery. Install zip from SD card and reboot. You're done!
Enjoy this firmware release, share is love!
How to Root and Install Custom Recovery in Motorola Xoom Wi-fi on ICS 4.0.3 Firmware
By the application of rooting on the Motorola Xoom, you can enjoy
several benefits of rooting on your device like enjoying the root only
apps, overclocking of your system and browsing the system files without
any permissions.

In this guide, we’ll tell you how you can root your Motorola Xoom Wi-Fi and install Custom Recovery on it. Warranty voids the warranty of your mobile phone or tablet, only way to get the warranty is by restoring the factory firmware.
In this guide, we’ll tell you how you can root your Motorola Xoom Wi-Fi and install Custom Recovery on it. Warranty voids the warranty of your mobile phone or tablet, only way to get the warranty is by restoring the factory firmware.
Preparing for the Installation:
- Backup all of your SMS Messages using SMS Backup Application.
- Sync all of your Contacts with the Gmail Application.
- Copy all of your notes manually to somewhere else, as these would be lost in the firmware upgrade.
- Take a backup of call logs, APN Settings, and other important things.
- Charge your mobile phone so that it would have around 50% battery.
- This guide is applicable only for the firmware version 4.0.3 and wouldn’t work perfectly on others. You can proceed, but at your own risk.
Step 1: Download and Copy the Required Files to Your Xoom
- Download the superuser package from here and the ClockworkMod Recovery Image from here. Save both on your computer, and Rename the Clockworkmod image to “recovery.img“.
- Connect Xoom to your computer using the data cable.
- Copy the downloaded packages to the root of your Xoom’s SD Card.
- Disconnect the device from the computer.
Step 2: Installing ClockworkMod Recovery on Xoom
- Turn off your device, and reboot it in the “fastboot” mode.
- Connect the device to the computer.
- Open up command prompt on your computer, and type “fastboot flash recovery recovery.img” this will push the recovery file to the device.
- The device will reboot automatically, when the images is copied.
- Disconnect the device from the computer.
Step 3: Installing Superuser and Rooting the device
- Turn off the device, and reboot it in the recovery mode. You can do this easily by holding the “Volume Down” button when the device shows the Motorola logo while booting up.
- Select, “Choose zip from SD Card” option and then select the superuser package file from the SD Card.
- The package will be installed on your device.
- Reboot your device.